To bleed brakes on a trailer, you will need to have access to the brake lines. Begin by making sure that there is no air trapped in the brake line and then locate the bleeder valve. This is usually found at the end of each wheel cylinder or drum brake assembly.
Next, use an open-ended wrench to loosen the bleeder valve and allow any residual fluid or air bubbles to escape. Once all of these particles have been removed, re-tighten the bleeder valve and check for leaks before reintroducing fresh brake fluid into the system with a funnel. Finally, apply pressure to two or three times on both sides of your trailer’s brakes while simultaneously opening up each individual bleeder valves one at a time until you see clean hydraulic fluid come out from each side of your trailer’s wheels.
- Prepare the Work Area: Before attempting to bleed trailer brakes, it is important to make sure you have a safe and organized work area
- Place the trailer on a level surface and secure it with wheel chocks or jack stands
- Make sure that your tools are laid out in an orderly fashion so that they can be easily accessed during the braking process
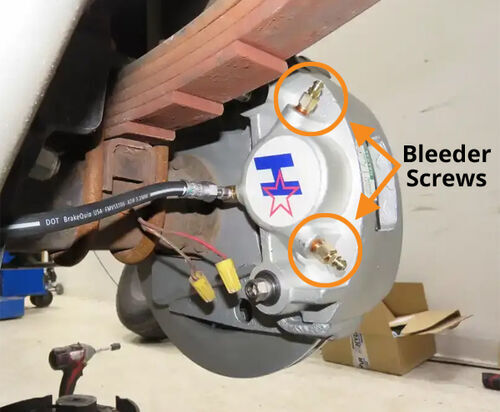
- Locate the Bleeder Screws: Each of the brake assemblies will have a bleeder screw located at its base near where the hydraulic line connects to it
- It is important to know which bleeder screw belongs to which wheel; typically this information will be provided by your trailer’s manufacturer or maintenance manual
- Attach Tubing To The Bleeder Screw: Once you have identified each of the bleeder screws, attach tubing securely onto each one using hose clamps or similar fasteners; this will allow air bubbles from inside of each brake assembly’s hydraulic lines to escape as they are released during bleeding procedure without spilling any fluid onto ground below you, thus keeping everything clean and dry around work site while performing job effectively
- Pump Brake Pedal & Open Bleed Screws: Now begin pumping up pressure within system by depressing and releasing brake pedal several times until there is no more slack left before opening up all four (or whatever number is applicable) bleeder screws simultaneously while continuing same pattern with foot pressure until desired amount has been reached (this should create small stream coming out from these points)
Dexter Manual Bleed HD
Bleeding Trailer Brakes by Yourself
Do-it-yourself bleeding of trailer brakes is not recommended due to the complexity of some brake systems and the potential risk of serious injury if done incorrectly. If you decide to attempt this task yourself, make sure you are familiar with the system you’re working on and have access to a professional mechanic in case something goes wrong. Additionally, always wear protective gear such as safety glasses when performing any type of maintenance or repair work on your vehicle.

Credit: www.youtube.com
How Do You Bleed Electric Over Hydraulic Brakes on a Trailer?
Bleeding electric over hydraulic brakes on a trailer is an important process that ensures your brake system is functioning correctly. The goal of the bleed process is to remove air bubbles from the brake lines and make sure there’s enough fluid in the system to provide adequate stopping power. To begin, you’ll need to connect one end of a hose or tube between the bleeder valve on each wheel cylinder and a container with fresh brake fluid beneath it.
Next, slowly pump the brakes until you see all air bubbles in the hose being expelled from the bleeder valve. As this happens, add more fresh brake fluid as needed so that it remains at its normal level throughout bleeding procedure. Once finished with one wheel cylinder, move onto another until all four have been completed and new liquid has replaced any remaining air pockets in your braking system.
Finally, check again for any leaks before taking your trailer out for a test ride!
How Do You Bleed New Trailer Brakes?
Bleeding the brakes on a new trailer can be a tricky process, but it is important to ensure that your trailer’s brakes are functioning properly. The first step in bleeding the brakes of a new trailer is to inspect the brake line for any damage or leaks. If there is any visible damage, you should replace the lines before attempting to bleed them.
Once this has been done, you will need to locate the bleeder screws at each wheel and then attach a hose or tube from each screw leading into an empty container placed below them. Next, use either a hand pump or pressure bleeder device to fill up the brake system with fresh fluid until all air bubbles have been cleared out and only clean liquid remains in sight. Afterwards, slowly loosen each bleeder screw one at a time while continuing to apply pressure until fresh fluid begins flowing out then quickly tighten it back up again afterward.
Be sure not forget to top off your brake reservoir after every cycle of bleeding so that your system does not run dry during this process as well as refilling it completely when finished with all four wheels’ brakes bled correctly!
How Do You Bleed Hydraulic Drum Brakes on a Trailer?
Bleeding the hydraulic drum brakes on a trailer is an important step in ensuring your trailer has proper braking power. The process of bleeding the brakes involves removing all air from the brake lines and replacing it with fresh fluid. It’s best to start by jacking up your trailer and taking off both wheels, so you can access the drums more easily.
Then loosen one bleeder screw at a time, starting with either rear wheel and work towards the front wheel. Place a drain pan underneath each bleeder screw to catch any old brake fluid that will be drained out during this process. Have someone slowly press down on the brake pedal while you open each bleeder valve until no bubbles appear in the old fluid coming out of each valve as well as when you close it back up again; top off reservoir if necessary before repeating for other side.
Lastly, make sure everything is tightened back up securely before testing driving – making sure to take extra caution when doing so!
What is the Best Way to Bleed Brakes?
Bleeding brakes is an essential part of maintaining your vehicle’s braking system. It helps to remove any trapped air bubbles that can cause brake failure and reduce the effectiveness of the brakes. The best way to bleed brakes is to use a two-person method, which requires one person in the driver’s seat and another working on the brake lines under the car.
First, you need to loosen all three bleeder valves located at each wheel, then have your helper pump up the pedal until it feels firm but not hard. Then, open up each valve one by one so that the fluid runs out steadily and evenly for about 30 seconds per valve before closing again. This process should be repeated several times until no more bubbles appear in the fluid coming from each line and all of them are running clear with no air pockets left behind.
Finally check for leaks around every connection point before refilling your brake reservoir with fresh fluid as necessary. Following this procedure carefully will ensure that you get optimal performance from your braking system and avoid costly repairs down the road!
Conclusion
Bleeding the brakes on a trailer is an important safety measure that should not be overlooked. Following this guide will ensure your trailer has properly functioning brakes and can help you avoid potentially dangerous situations. The process is simple, just make sure to take proper precautions when working with brake fluid as it can damage paint and clothing.
If you’re ever uncertain about any step in the process, don’t hesitate to consult a professional for advice or assistance.