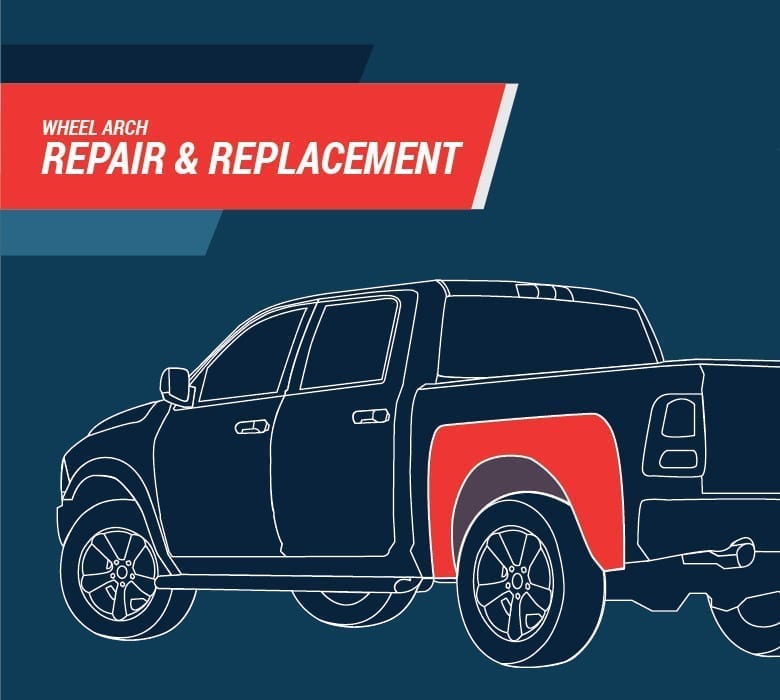
Installing a wheel arch repair panel is an effective way to restore the appearance and structural integrity of your vehicle’s body after rust or damage.
This process involves cutting away the damaged area, preparing the surface, and welding or bonding the new panel in place. Proper alignment and finishing ensure a seamless repair.
In this guide, you’ll learn the essential steps to install a wheel arch repair panel, including tools, preparation, and techniques to ensure a professional result.
Let’s dive into the detailed process for a successful repair!
Introduction To Wheel Arch Repair Panels
Wheel arches are essential parts of a car. They protect tires and support the body. Maintaining wheel arches helps prevent rust and damage. Damaged wheel arches can lead to bigger problems. Fixing them early saves money. Clean wheel arches regularly to avoid issues.
Rust spots on the wheel arch are a warning sign. Cracks and dents also indicate damage. If the wheel arch makes noise, it needs fixing. Loose or missing parts should be replaced. Inspect wheel arches frequently to catch problems early.
Tools And Materials Required
You need some basic tools to get started. A screwdriver will help with screws. Pliers are useful for gripping and pulling. Sandpaper helps smooth rough surfaces. Masking tape protects areas you don’t want to touch.
A drill makes holes in the metal. Safety goggles protect your eyes from dust. Gloves keep your hands safe. A jigsaw cuts metal sheets easily. Finally, a measuring tape ensures accurate measurements.
Choosing the correct repair panel is very important. First, measure your wheel arch. Make sure your measurements are correct. Next, find a panel that matches your car model. Look for high-quality materials.
A good panel will last longer. Check reviews before buying. Happy customers mean good quality. Always buy from a trusted seller. This ensures you get the right part. Finally, compare prices. Don’t overpay for the same quality.
Preparation Steps Before Installation
Ensure all necessary tools and materials are gathered before starting. Clean the wheel arch area thoroughly to remove any debris.
Cleaning The Work Area
Start by cleaning the work area thoroughly. Remove any dirt and grime with a damp cloth. Ensure the area is dry before proceeding. Use a vacuum to suck up loose debris. A clean surface ensures better adhesion.
Removing Rust And Debris
Inspect the wheel arch for rust and debris. Use a wire brush to scrub off loose rust. Apply a rust remover for stubborn spots. Wipe the area clean with a cloth. Use sandpaper to smooth the surface. Removing rust ensures a longer-lasting repair. Be careful not to damage the surrounding areas.
Removing The Damaged Wheel Arch
First, gather all your tools. You will need a wrench, screwdriver, and cutter. Use the wrench to remove any screws or bolts. Be sure to keep the screws safe.
Next, carefully use the cutter to trim the damaged area. Ensure your cuts are clean and precise. This will make the installation easier.
After trimming, smooth the edges with sandpaper. This will help the new panel fit better.
Check for any hidden screws or attachments. Remove them if found. Now, gently pull away the damaged wheel arch. If it is stuck, use a soft tool to pry it off. Take your time to avoid further damage.
Always wear safety gloves to protect your hands. Use safety goggles to protect your eyes from debris. Ensure your workspace is well-lit. This helps you see clearly. Keep your tools organized to avoid accidents.
Work slowly and carefully. Rushing may cause mistakes or injuries. Keep a first aid kit nearby. It’s better to be prepared for any minor cuts or injuries.
Test Fitting The New Panel
Place the new panel over the wheel arch. Make sure it fits well. Check if the edges match the old panel. Look for gaps or overlaps. If you see any, the panel needs adjustment. Proper alignment ensures a smooth finish. This step is crucial for a neat look.
If the panel does not align, use a marker to note areas needing changes. Trim or bend the panel for a better fit. Re-check the alignment after adjustments. Repeat these steps until it fits perfectly. Use clamps to hold the panel in place. This helps in making fine adjustments. A well-fitted panel ensures a professional look.
Credit: raybuck.com
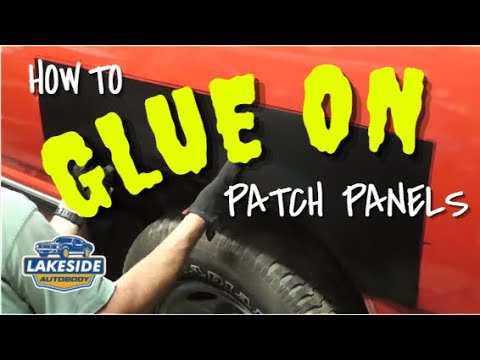
Securing The Panel In Place
Secure the panel in place by aligning it with the wheel arch. Use clamps or magnets to hold it steady. Ensure a snug fit before welding or bolting for optimal stability.
Welding Vs. Adhesive Methods
Welding is strong and durable. It creates a solid bond. Use a welder to attach the panel. Wear safety gear to protect yourself. Follow the welder’s instructions.
Adhesive methods are easier. They need less equipment. Use automotive adhesive for a strong hold. Clean the surfaces before applying. Press the panel firmly in place. Let the adhesive cure fully before driving.
Tips For A Seamless Fit
Ensure the panel aligns perfectly with the wheel arch. Trim any excess material. Use clamps to hold the panel in place. Sand the edges for a smooth finish. Apply primer and paint to match the car’s color. Check for gaps and fill them with sealant. This helps to prevent rust.
Finishing Touches
Ensure proper alignment and secure fitting of the wheel arch repair panel by following precise installation steps. Achieve a seamless finish for your vehicle’s bodywork.
Applying Filler And Sanding
Apply filler to the repaired area for a smooth surface. Spread it evenly using a putty knife. Allow the filler to dry completely. Once dry, sand the area with fine-grit sandpaper. This will make the surface even
Check for any imperfections and apply more filler if needed. Sand again until the area is perfectly smooth. Wipe off any dust using a clean cloth.
Priming And Painting
Apply a primer to the sanded area. This helps the paint stick better. Let the primer dry. After drying, sand the area lightly again. This ensures a smooth base for painting. Spray a coat of paint that matches your car’s color.
Let the paint dry. Apply a second coat if needed. Make sure the paint is even and smooth. Finally, apply a clear coat to protect the paint. Allow everything to dry completely.

Credit: m.youtube.com
Maintenance Tips Post-installation
Properly seal and paint the wheel arch repair panel to prevent rust. Regularly inspect for any signs of damage. Clean the area frequently to maintain its condition.
Regular Inspection And Care
Regular inspection helps in identifying issues early. Check for signs of rust or damage. Clean the wheel arch frequently. Use a soft brush and water. Avoid harsh chemicals. They can damage the new panel. Dry the area thoroughly after washing.
Preventing Future Damage
Apply a protective coating to the wheel arch. This helps in preventing rust. Use high-quality paint or sealant. Check tire pressure regularly. Overinflated tires can cause damage. Avoid driving on rough roads. They can harm the wheel arch. Fix any dents or scratches immediately. This prevents rust from forming.
Common Mistakes To Avoid
Fitment issues can cause many problems. Always check the panel before installing it. Ensure it matches the original shape and size. Incorrect fitment can lead to poor performance. Test fit the panel to see if it aligns properly. Fix any misalignments before final installation. This will save you time and effort later.
Sealing is crucial to prevent rust and damage. Clean the area well before applying sealant. Use high-quality sealant for better protection. Make sure to cover all gaps and edges. Check for any missed spots and seal them. Proper sealing extends the life of your repair.
Professional Vs. Diy Installation
Opting for professional installation ensures precise alignment and longevity of your wheel arch repair panel. DIY installation offers cost savings but demands skill and patience to achieve a perfect fit.
When To Seek Professional Help
Seek professional help if you lack tools or experience. Professionals ensure quality and safety. They have proper training and equipment. Complex repairs need expert skills. Professionals can save you time and effort.
Mistakes can lead to costly fixes. Professional work may come with a warranty. Insurance may cover professional repairs. If unsure, it’s safer to trust a pro.
Benefits Of Diy Approach
DIY saves money on labor costs. Gain new skills and experience. You control the process and materials. Flexible timing lets you work at your pace. Pride in completing a project yourself. Access to online tutorials and guides. DIY can be a fun and rewarding experience. You can learn from mistakes and improve.

Credit: raybuck.com
Frequently Asked Questions
How Much Does It Cost To Repair A Wheel Arch Panel?
The cost to repair a wheel arch panel typically ranges from $200 to $500. Prices vary based on damage severity and location.
How Do You Fix A Rusted Wheel Arch?
To fix a rusted wheel arch, clean the area, sand off rust, apply rust converter, prime, and paint.
How To Repair A Hole In A Wheel Arch?
Clean the area around the hole. Sand it down. Apply body filler. Let it dry, then sand it smooth. Paint to match.
How Much To Repair Rusted Wheel Arches?
Repairing rusted wheel arches costs between $150 to $500 per wheel arch. Prices vary based on severity and location.
Conclusion
Installing a wheel arch repair panel is straightforward with the right tools and guidance. Follow each step carefully for a seamless fit. Ensure the area is clean and rust-free to prolong the panel’s life. With patience and precision, you can restore your vehicle’s look and functionality effectively.
Happy repairing!