Removing stuck U-joint caps can be a challenging task, often encountered during driveshaft repairs or replacements. Over time, corrosion, rust, and dirt can seize these components, making them difficult to detach.
Understanding the right techniques and tools is essential to prevent damage and ensure a successful removal.
In this guide, we’ll walk you through effective methods to safely remove stuck U-joint caps, restoring your vehicle’s functionality and improving its performance. Whether you’re a seasoned mechanic or a DIY enthusiast, these tips will help you tackle the job with confidence.
How to Remove Stuck U-Joint Caps: A Step-by-Step Guide
Removing stuck U-joint caps can be a daunting task, but with the right tools and techniques, you can get the job done effectively. Follow these detailed steps to safely remove stuck U-joint caps from your vehicle’s driveshaft.
Tools and Materials Needed
- U-joint press or ball joint separator
- Socket set and wrenches
- Hammer
- Penetrating oil (like WD-40 or PB Blaster)
- Safety goggles and gloves
- Clean rag
Step 1: Prepare the Work Area
- Safety First: Wear safety goggles and gloves to protect yourself.
- Lift the Vehicle: Use a jack to lift the vehicle and secure it on jack stands for safety.
Step 2: Access the U-Joint
- Remove the Driveshaft: Unbolt the driveshaft from the differential and transmission to access the U-joint.
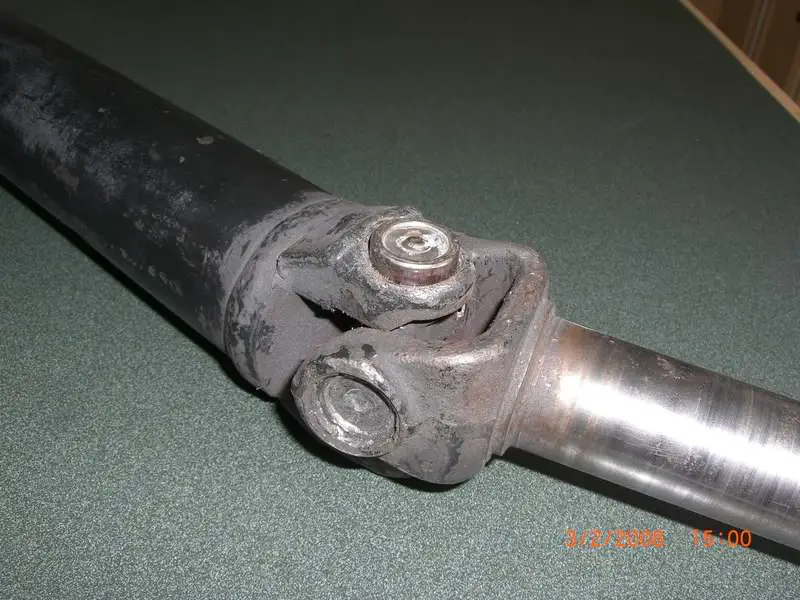
- Inspect the U-Joint: Check the condition of the U-joint caps and the surrounding area for any visible damage or rust.
Step 3: Apply Penetrating Oil
- Soak the Caps: Generously apply penetrating oil around the U-joint caps and let it sit for at least 15-30 minutes to loosen rust and grime.
Step 4: Use a U-Joint Press
- Position the U-Joint Press: Place the U-joint press over the U-joint and cap. Ensure it is aligned correctly.
- Apply Pressure: Gradually tighten the press. The pressure will help push the cap out of the yoke.
- Tap if Necessary: If the caps don’t budge, gently tap them with a hammer while applying pressure to the press.
Step 5: Alternative Methods
- Ball Joint Separator: If the press doesn’t work, a ball joint separator can help. Insert it between the U-joint and yoke, then use a hammer to drive it down.
- Heat: Applying heat to the yoke using a propane torch can expand the metal, making it easier to remove the caps. Be cautious to avoid damaging nearby components.
Step 6: Clean the Area
- Remove Debris: Once the caps are removed, clean the U-joint area to remove any rust, dirt, or debris.
- Inspect for Damage: Check the U-joint and yoke for any damage that might need addressing before installing new components.
Step 7: Install New U-Joint (Optional)
- Replace the U-Joint: If you’re installing a new U-joint, follow the manufacturer’s instructions for proper installation and ensure everything is secure.
U Joint Removal Without Press
Removing a U joint without a press can be done fairly easily with the right tools and some patience.
To begin, use a hammer to carefully dislodge the old U joint from its yoke. Once it is loose, use an adjustable wrench or large pair of pliers to remove any clips that are holding the bearing caps in place.
If needed, you may need to heat up the end of one or both yokes before attempting to remove them. With all parts removed and safely out of reach, take your time and slowly wiggle each part out until it’s free from its housing.
How to Remove U Joint Clips
Removing u joint clips is an important part of maintaining your vehicle’s drivetrain. The process requires some basic tools and a little bit of patience.
First, you’ll need to locate the clip which holds the u joint in place; it will be on either side of the universal joint.
Then, using a flathead screwdriver or chisel, carefully pry off each clip until it comes loose from its mountings.
Finally, remove the old clips and replace them with new ones for optimal performance. With these simple steps, you can keep your driveshaft functioning properly without any trouble!

Credit: www.youtube.com
How Do You Get a Stuck U-Joint Out of a Drive Shaft?
Getting a stuck u-joint out of a drive shaft can be an intimidating task for even the most experienced DIYers. The good news is, with the right tools and technique, removing a stuck u-joint from your drive shaft doesn’t have to be difficult or time consuming.
Before you start, make sure you have the necessary tools on hand such as heavy duty vice grips and large adjustable wrenches.
To begin, loosen any bolts that connect the u-joint to other parts of your vehicle. Once those are removed, secure the drive shaft in a vice grip so it won’t move while you’re working on it.
Next use a hammer to tap around each bearing cap until they become loose enough to remove by hand.
Finally, carefully twist off both bearing caps and pull out each individual joint cup with pliers or adjustable wrench. With this process complete your old u-joint should now be free from its connection point on the driveshaft!
How Do You Pop Out a U-Joint?
Popping out a U-Joint is a fairly straightforward process, but it requires some knowledge and special tools to do it correctly.
To begin, the drive shaft must be disconnected from the vehicle. Once this is done, the U-joint can easily be accessed.
It’s important to note that there are two types of U-joints: ball and trunnion style. Ball style joints require special pliers or pullers while trunnion type use snap rings to secure them in place which can usually be removed by hand.
After identifying what type of joint you have, you should inspect it for any wear or damage before proceeding further with removal.
If everything looks good then it’s time to remove the old joint using either your hands if its snap ring style or a pair of pliers/puller if its ball type. Once removed clean up all surfaces where the joint will fit in order to ensure proper installation when reinstalling later on down the line.
Now simply reverse these steps when putting back together and your ride should now have a new U-joint!
How Do You Remove a Broken U-Joint Clip?
Removing a broken u-joint clip is not a difficult job, but it can be time consuming. First, you will need to locate the clip that holds the u-joint together. This can usually be found on the underside of the vehicle near where the transmission meets the driveshaft.
Once located, you will need to disconnect any wires or vacuum hoses connected to it and then remove any bolts that are holding it in place.
After this is done, use a pair of pliers or needle nose pliers to carefully pry off each individual part of the broken clip from its position in order for it to come out completely. If necessary, use some penetrating oil (such as WD40) to loosen up rust and debris that may have built up around it over time.
Finally, once all pieces are removed from their respective positions, clean up any remaining debris before reinstalling a new U-Joint Clip into its proper place using fresh hardware if needed and reconnecting anything that was disconnected earlier during removal process.
What Tool is Used to Remove U-Joints?
Removing U-joints can be a tricky process, but it’s important to make sure that you have the right tools for the job. The main tool used to remove U-joints is a u-joint removal tool. This is usually a combination of two pieces: A large socket with an extended handle and an adjustable sleeve.
To use the tool, first place it over the end of the axle shaft so that it fits snugly in between both bearing caps on either side of the joint. Then slowly tighten down on one side until you feel resistance from within the joint; this indicates that you’ve reached far enough into the joint to loosen up its components.
At this point, turn your attention to adjusting the sleeve so that it matches up with whichever size cap lock nut your vehicle may require (often 18mm).
Once everything is properly adjusted and aligned, begin turning counterclockwise while applying pressure along each axis until all components are loose enough to be removed by hand or using pliers if necessary. With some patience and know how, removing U-joints can now be done quickly and easily!
Conclusion
Removing stuck U joint caps is a difficult and time consuming task, but it can be done with the right tools and techniques. With patience and perseverance, you will be able to remove the stuck U joint caps from your vehicle regardless of their age or condition. Taking apart your vehicle’s drive line may seem intimidating at first, but following these steps should make it much easier.
Don’t forget that if all else fails, you can always take your car to an experienced mechanic for help removing the stuck U joint caps.