To remove red from tail lights, use sandpaper to scuff the surface and apply a clear coat spray. Ensure the lights are clean and dry before starting.
Customizing your vehicle’s tail lights can enhance its appearance. Removing the red tint from tail lights is a popular modification among car enthusiasts. This process requires some basic tools and a bit of patience. Begin by gathering sandpaper, clear coat spray, and masking tape.
Clean the tail lights thoroughly to remove any dirt or debris. Carefully sand the surface to remove the red tint, and then apply a clear coat to protect the lights. This simple modification can give your vehicle a sleek, modern look while maintaining functionality and safety. Always follow safety guidelines during the process.
Introduction To Tail Light Tinting
Customized tail lights make your car look unique. Many people like to change their car’s look. Tail light tinting is one popular option. Tinted tail lights can give a sleek appearance. Some people prefer blacked-out lights. Others like colored tints. It’s a great way to express personal style.
Check local laws before modifying tail lights. Some places have strict rules. You might get a ticket if you break them. Make sure the lights are still bright. Safety is very important. Law enforcement must see your signals. Always prioritize legal and safe modifications.
Materials Needed For Removing Red Tint
Safety gloves protect your hands. Protective goggles keep your eyes safe. Microfiber cloths help with cleaning. Plastic scraper removes the tint without scratching. Masking tape covers areas you don’t want to touch. Spray bottle holds your chosen solvent. Disposable towels are useful for wiping.
Rubbing alcohol is effective and safe. Acetone works quickly but use with caution. Adhesive remover is gentle on surfaces. Commercial tint removers are designed for this job.
Preparation Steps For A Safe Procedure
Begin by wiping the tail lights with a clean cloth. Use soap and water to remove dirt and grime. Make sure the lights are completely dry before proceeding. This will ensure a smooth and clean surface. A clean surface helps in achieving better results. Dirt and debris can cause scratches during the process.
Use painter’s tape to cover the areas around the tail lights. This will protect the car’s paint. Newspapers or plastic sheets can also be used to cover larger areas. Make sure to secure them properly. This prevents any accidental damage. Proper protection ensures a cleaner job and keeps the car safe.
Applying Solvent To Dissolve Red Tint
Apply the solvent evenly using a clean cloth. Make sure to cover all the red areas. Use small amounts to avoid damage. Rub gently in circular motions. Check your progress often. Reapply solvent if needed. Work in a well-ventilated area.
Wear protective gloves to keep your hands safe. Always use safety goggles. Keep the solvent away from your face. Work in an open space. Do not inhale the fumes. Wash your hands after use. Store chemicals safely. Keep them out of reach of children.
Peeling Off The Tint Layer
Start by cleaning the tail lights with soap and water. This helps to remove dirt and grime. Use a hairdryer to warm up the tint. Warming makes peeling easier. Gently lift a corner of the tint with your fingernail. If it is hard, use a plastic scraper. Slowly peel off the tint. Pull it back at a low angle. Avoid pulling straight up. This can tear the tint.
Sticky residue left behind? Use rubbing alcohol to clean it. Tint not peeling off easily? Warm it a bit more with the hairdryer. Scratches on the tail light? Buff it with a soft cloth and some car polish. Tint tearing during removal? Start peeling from another corner.
Cleaning And Polishing Post-removal
First, use a soft cloth and warm soapy water to clean the tail lights. Make sure to remove any remaining dirt or debris. Rinse the tail lights with clean water and dry them with a microfiber cloth. Inspect the surface for any scratches or imperfections. If needed, use a plastic cleaner to buff out minor scratches. Reapply the cleaner until the surface is smooth and clear.
Apply a small amount of plastic polish to a clean, soft cloth. Rub the polish onto the tail lights in small, circular motions. Let the polish dry for a few minutes before wiping it off with a clean cloth. Repeat if necessary to achieve a high shine. To protect the finish, apply a coat of car wax. Buff the wax until the tail lights are shiny and clear. Now, your tail lights should look new and bright.
Alternatives To Removing Red Tint
Overlay films can change the color of your tail lights. They are easy to apply and can be removed without damage. These films come in many colors, including smoke and clear. They are affordable and can be found in most auto stores. Using overlay films can also protect your tail lights from scratches and UV rays. This makes them look new for longer.
Professional tinting services ensure a smooth and even finish. Experts use high-quality materials and tools. This reduces the risk of bubbles or peeling. Professional services can also offer a warranty for their work. This provides peace of mind. Many tinting shops offer custom colors and designs. This allows you to personalize your car’s look.

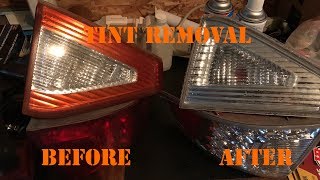
Credit: www.clublexus.com
Maintenance Tips For Tail Lights
Always keep your tail lights clean. Dirt and grime can cause damage over time. Use a soft cloth to clean the lights. Make sure to inspect them for cracks or damage. Replace any damaged parts immediately to ensure safety. Regular checks help in maintaining their brightness. Clean tail lights improve visibility on the road.
Long-term care is important for tinted lights. Use a special cleaner for tinted surfaces. This prevents scratches and keeps the tint looking good. Avoid harsh chemicals that can damage the tint. Regular cleaning extends the life of your tinted lights. Always handle with care to avoid peeling the tint.
Conclusion: Enjoying Your Vehicle’s New Look
Relish the sleek, modern look of your vehicle after successfully removing red from the tail lights. Enhancing your car’s appearance can boost both style and satisfaction.
Recap Of The Process
First, gather the needed tools. Clean the tail lights. Remove the screws and clips. Pull out the tail light carefully. Use a hairdryer to soften the adhesive. Peel off the red tint film. Clean the surface again. Apply the new film. Press firmly to remove bubbles. Reattach the tail lights. Check if they work properly. Make sure all screws and clips are tight.
Compliance And Aesthetic Satisfaction
Ensure the new tail light film meets legal standards. Safety and compliance are crucial. Enjoy the fresh look of your vehicle. A clean and new look adds value. Drive with confidence and style. Your hard work paid off. Your vehicle looks great and follows the rules.
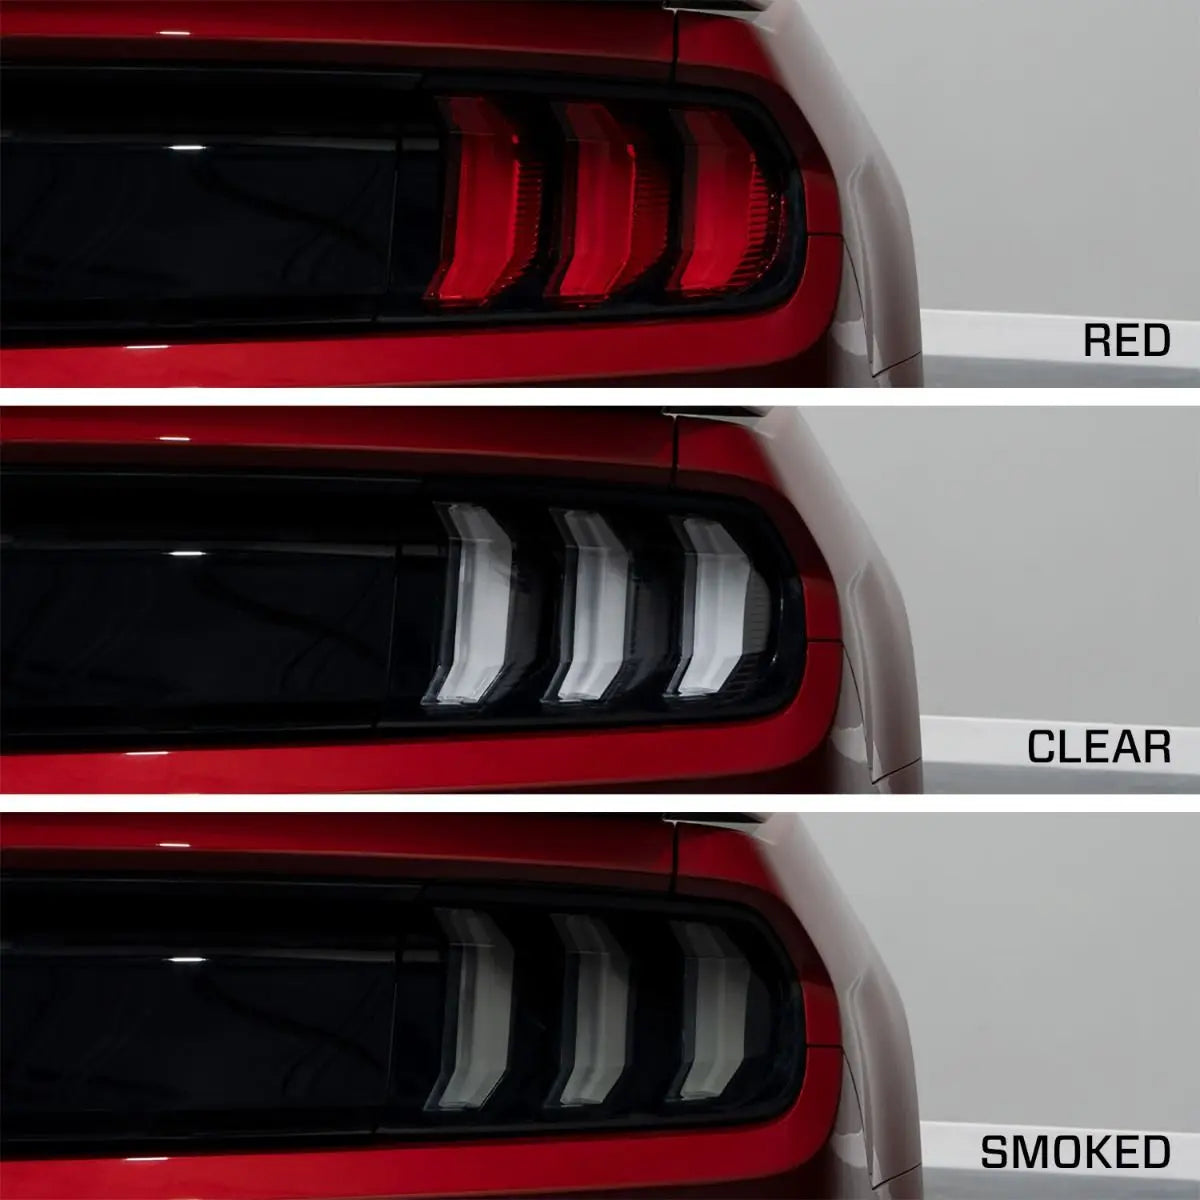
Credit: hellhorseperformance.com

Credit: m.youtube.com
Frequently Asked Questions
Can You Remove The Red Tint From Tail Lights?
Yes, you can remove the red tint from tail lights. Use sandpaper, polishing compound, and a clear coat spray.
How To Remove Paint Off Tail Lights?
To remove paint from tail lights, use a plastic scraper and rubbing alcohol. Gently scrub the surface.
How Do I Make My Tail Lights Clear Again?
Clean tail lights with toothpaste and a soft cloth. Rinse and dry thoroughly. Apply a UV protectant spray.
How To Remove Clear Coat From Tail Lights?
To remove clear coat from tail lights, gently sand with 800-grit sandpaper. Then, use rubbing compound to polish. Finally, clean thoroughly.
Conclusion
Removing red from tail lights can enhance your vehicle’s look. Follow the steps carefully for the best results. Always prioritize safety and check local regulations before making changes. With the right tools and patience, you can achieve a sleek, modern appearance.
Enjoy your upgraded tail lights!