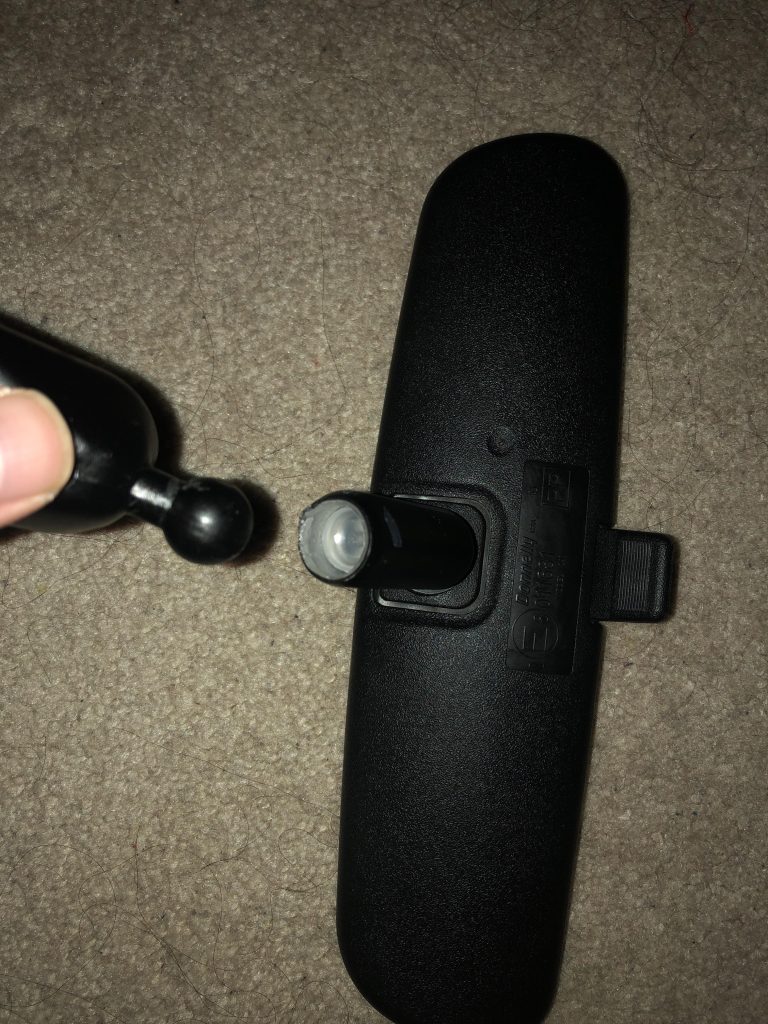
To remove a rear view mirror from a ball joint, gently pry off the mirror using a flat tool. Twist and pull to detach it from the mount.
Removing a rear view mirror from a ball joint may seem daunting, but it’s a simple process with the right approach. Whether you’re replacing a damaged mirror or upgrading to a newer model, knowing how to safely remove it can save you time and money.
This guide provides clear, step-by-step instructions to ensure a smooth and hassle-free removal. Always handle the mirror and tools with care to avoid damage. Once you remove the mirror, you can proceed with your replacement or repair tasks confidently and efficiently.
Credit: www.the370z.com
Introduction To Rear View Mirror Removal
The rear view mirror is an essential component of any vehicle. It helps drivers see what is behind them. Sometimes, you might need to remove it. This guide will show you how to do it easily. Follow these steps carefully to ensure a smooth process.
Importance Of Knowing How To Remove
Knowing how to remove the rear view mirror can be very useful. It allows for easier cleaning and maintenance. You can also replace a damaged mirror yourself. This saves both time and money. Ensuring proper installation can improve safety while driving.
Common Reasons For Detachment
There are several reasons why you might need to detach the rear view mirror. Here are some common ones:
- Damage or cracks in the mirror.
- Upgrading to a new mirror with advanced features.
- Cleaning the mirror and the surrounding area.
- Adjusting the mirror for better visibility.
Tools And Materials Needed
Removing a rear-view mirror from a ball joint can seem daunting. But with the right tools and materials, the process becomes straightforward. Below, you’ll find a comprehensive list of essential tools and additional helpful materials to make this task easier.
List Of Essential Tools
- Screwdriver Set: Both flathead and Phillips screwdrivers are needed.
- Socket Wrench: This helps in loosening and tightening nuts.
- Trim Removal Tool: Useful for safely removing any trim around the mirror.
- Heat Gun or Hair Dryer: To soften any adhesive used on the mirror.
- Protective Gloves: Keeps your hands safe from sharp edges.
- Safety Glasses: Protects your eyes from debris.
Additional Helpful Materials
- Adhesive Remover: For removing any leftover glue or adhesive.
- Microfiber Cloth: To clean the mirror and surrounding area.
- Masking Tape: Helps in marking the position of the mirror before removal.
- Plastic Pry Tool: Prevents damage to the car’s interior.
- Replacement Mirror Adhesive: If you plan to reattach the mirror.
Having these tools and materials ready will make the process smooth and efficient. Always wear protective gear to ensure your safety during the task.
Safety Precautions
Before you start removing the rear view mirror from the ball joint, it’s crucial to follow safety precautions. These steps ensure you don’t harm yourself or damage your car. Below are some essential safety measures to take.
Protective Gear
Wearing the right protective gear keeps you safe during the removal process. Here’s a list of what you’ll need:
- Safety Glasses: Protect your eyes from any flying debris or broken glass.
- Gloves: Ensure you wear gloves to protect your hands from sharp edges.
- Long Sleeves: Wear long sleeves to protect your arms from scratches or cuts.
Pre-removal Checks
Before removing the mirror, perform these essential checks:
- Inspect the Mirror: Check for any cracks or damage. A damaged mirror can break easily.
- Gather Tools: Make sure you have all necessary tools like a screwdriver or a wrench.
- Read the Manual: Refer to your car’s manual for specific instructions on mirror removal.
Following these safety precautions will make the process smoother and safer.

Credit: m.youtube.com
Initial Preparation
Before removing your rear view mirror, you need to prepare properly. This will ensure a smooth and safe process. Proper preparation minimizes the risk of damage and ensures a successful removal.
Cleaning The Mirror And Joint Area
Begin by cleaning the mirror and joint area. Use a soft cloth and mild cleaner. This helps remove any dirt or debris that could interfere with the removal process.
- Wipe the mirror with a damp cloth.
- Clean the joint area thoroughly.
- Ensure both parts are completely dry before proceeding.
Cleaning ensures you have a clear view of the parts you will work on. This step is crucial for a successful removal.
Positioning Your Vehicle
Next, position your vehicle in a safe and well-lit area. This provides the necessary space and visibility needed for the task.
- Park your vehicle on a flat surface.
- Engage the parking brake to prevent any movement.
- Ensure the area is well-lit or use additional lighting if necessary.
Proper positioning guarantees safety and ease during the removal process. Make sure the car is stable and well-supported.
Technique For Loosening The Ball Joint
Removing a rear view mirror from a ball joint can be tricky. The key is to use the right technique. This guide will help you through the process. Follow these steps to ensure you don’t damage your mirror or the ball joint.
Gentle Twisting Method
Start with the gentle twisting method. This method is safe and effective. Use it to avoid damaging the mirror.
- Hold the mirror firmly with both hands.
- Twist the mirror gently in a clockwise direction.
- Apply steady, even pressure as you twist.
- Listen for any clicks or sounds indicating movement.
If the mirror doesn’t come loose, don’t force it. Move on to the next method.
Applying Controlled Force
Sometimes, a little more force is needed. This method involves applying controlled force to the mirror.
- Place one hand on the mirror and the other on the base.
- Push the mirror away from the ball joint with steady pressure.
- Use a small tool if needed to pry the mirror gently.
- Ensure you apply force evenly to avoid breaking the mirror.
If the mirror still doesn’t budge, re-evaluate your technique. Make sure you are applying force in the right direction. Remember, patience is key. Avoid rushing the process to prevent damage.
Using A Removal Tool
Removing the rear view mirror from a ball joint can be challenging. Using the right removal tool makes this task easy and quick. This section will guide you through the process.
Choosing The Right Tool
Choosing the correct tool is crucial for the job. A specialized rear view mirror removal tool is ideal. These tools are designed to fit perfectly into the ball joint. This ensures a smooth and safe removal process.
Check the compatibility of the tool with your car model. Not all removal tools work with every car. Read the tool’s description carefully before buying. Here is a simple comparison table to help you choose:
| Tool Name | Compatibility | Price |
|---|---|---|
| MirrorTool Pro | Most Cars | $15 |
| Universal Mirror Tool | All Cars | $20 |
| Basic Mirror Remover | Few Cars | $10 |
Step-by-step Usage
Follow these steps to use the removal tool effectively:
- Ensure the car is parked and turned off.
- Locate the ball joint where the mirror connects to the windshield.
- Insert the removal tool into the ball joint slot.
- Apply gentle pressure and twist the tool slightly.
- Pull the mirror away from the ball joint carefully.
- Inspect the ball joint and the mirror for any damage.
Using the right tool and following these steps will make the process easy. Always handle the mirror with care to avoid damage.
Alternative Methods For Stubborn Joints
Removing a rearview mirror from a ball joint can be tricky. Use a flathead screwdriver to gently pry it off. Ensure you protect the windshield during the process to avoid damage.
Removing a rear view mirror from a ball joint can be tricky. Stubborn joints often resist standard removal methods. Here are some alternative techniques to make the task easier.Heat Application Technique
Heating the joint can help loosen the adhesive holding it in place. Follow these steps:- Use a hairdryer or heat gun.
- Heat the area around the ball joint for 2-3 minutes.
- Avoid overheating to prevent damage to plastic parts.
- Keep the heat source moving to distribute the heat evenly.
- Use protective gloves to avoid burns.
- After heating, use a flat tool to gently pry the mirror off.
Diy Solutions
For those who prefer DIY methods, here are some effective solutions:| Solution | Description |
|---|---|
| Soap and Water | Mix soap and water. Apply to the joint to reduce friction. |
| WD-40 | Spray WD-40 around the joint. Wait a few minutes before removal. |
| Vinegar | Soak a cloth in vinegar. Wrap it around the joint for 15 minutes. |
- Always test solutions on a small area first.
- Use a plastic prying tool to avoid scratching.
- Be patient and let the solution work before applying force.
Post-removal Steps
After successfully removing the rear view mirror from the ball joint, it’s crucial to follow some post-removal steps. These steps ensure that the mirror and ball joint are in good condition and ready for re-installation or replacement. Below are the essential steps to take after removal.
Inspecting The Ball Joint And Mirror
First, thoroughly inspect the ball joint. Look for signs of wear or damage. A damaged ball joint may cause the mirror to be unstable.
- Check for cracks or breaks: Examine the ball joint surface for any visible cracks or breaks.
- Assess the tightness: Ensure the ball joint is not loose. A loose joint will not hold the mirror properly.
- Clean the ball joint: Use a soft cloth to wipe away any dirt or debris.
Next, inspect the rear view mirror. Ensure the mirror glass is not cracked or chipped. A damaged mirror can impair your vision while driving.
- Examine the mirror housing: Check for any damage to the plastic or metal housing of the mirror.
- Look at the attachment point: Ensure the area where the mirror attaches to the ball joint is not damaged.
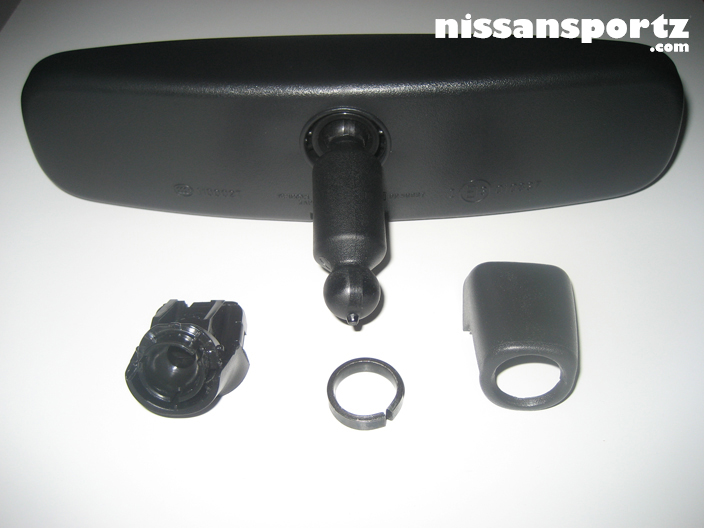
Prepping For Re-installation Or Replacement
After inspection, prepare the ball joint and mirror for re-installation or replacement. This preparation ensures a smooth and secure fit.
- Lubricate the ball joint: Apply a small amount of lubricant to the ball joint. This helps the mirror move smoothly once re-installed.
- Align the mirror: Position the mirror correctly. Ensure it aligns with the ball joint for easy attachment.
- Gather necessary tools: Have all required tools ready. This includes screwdrivers, wrenches, or any other specific tools for your vehicle.
If replacing the mirror, choose a compatible model. Ensure it matches the specifications of your vehicle. Double-check the new mirror for any defects before installation.
By following these post-removal steps, you ensure the rear view mirror and ball joint are in optimal condition for re-installation or replacement. This guarantees your mirror remains secure and functional, providing you with a clear view while driving.
Troubleshooting Common Issues
Removing a rear view mirror from a ball joint can be tricky. Sometimes, you may face problems that make the task harder. In this section, we will discuss two common issues: joint stiffness and accidental breakage. Knowing how to tackle these can make the job easier and safer.
Addressing Joint Stiffness
Joint stiffness is a common issue. It happens because the ball joint may be old or rusty. Here’s how you can fix it:
- Apply a small amount of lubricant to the joint.
- Use a hairdryer to warm the joint. This helps to loosen it.
- Gently wiggle the mirror to free the joint.
If the joint is still stiff, try using a rubber mallet. Tap the mirror base lightly. This can help to free the joint without breaking it.
Dealing With Accidental Breakage
Accidental breakage can happen. A sudden move or too much force can cause this. Follow these steps to handle it:
- Wear protective gloves and safety glasses.
- Use a vacuum cleaner to pick up any broken pieces.
- Check the ball joint for damage.
- If the joint is broken, you may need a replacement.
To avoid breakage, always use gentle, steady pressure. Never force the mirror off the joint.
By following these steps, you can troubleshoot common issues and remove your rear view mirror safely.

Credit: m.youtube.com
Maintaining Your Rear View Mirror
Keeping your rear view mirror in top condition is crucial for safe driving. Regular maintenance can prevent potential issues and ensure that your mirror serves you well. Below are some essential tips for maintaining your rear view mirror.
Regular Cleaning And Adjustments
Regular cleaning is vital to keep your rear view mirror clear. Dust and grime can accumulate, obstructing your view. Use a soft cloth with a mild cleaner to wipe the mirror surface. Avoid using harsh chemicals as they can damage the mirror.
- Wipe the mirror gently with a soft cloth.
- Use a mild cleaner for better results.
- Avoid harsh chemicals to prevent damage.
Adjust the mirror frequently to ensure a clear view of the road behind you. This can help you detect any blind spots and avoid accidents. Follow these steps to adjust your rear view mirror properly:
- Sit in your driver’s seat.
- Adjust the mirror to see the full rear window.
- Ensure there are no blind spots.
When To Seek Professional Help
Sometimes, issues with your rear view mirror may require professional assistance. Here are some scenarios where you should seek help:
| Issue | Description |
|---|---|
| Loose Mirror | If the mirror is loose and cannot be fixed, consult a professional. |
| Cracked Mirror | A cracked mirror needs immediate replacement by an expert. |
| Electrical Issues | For mirrors with electrical components, professional help is necessary. |
If you notice any of these issues, do not delay in seeking help. Driving with a malfunctioning rear view mirror can be dangerous.
Frequently Asked Questions
How Do You Remove A Rear View Mirror From A Mount?
To remove a rear view mirror from a mount, first, detach the mirror by loosening the screws. Slide the mirror off the mount gently. If adhesive is used, apply heat with a hairdryer to soften it. Use a plastic pry tool to carefully separate the mirror from the mount.
How Do You Fix A Loose Ball Joint On A Rear View Mirror?
Tighten the screw or bolt on the mirror’s base. Use a small screwdriver or wrench. If it’s broken, replace the ball joint.
How To Remove Rear View Mirror Mounting Button From Windshield?
Use a heat gun to warm the adhesive. Gently twist the mounting button with pliers until it loosens. Clean residue.
How To Stop A Rear View Mirror From Moving?
Tighten the screws on the rearview mirror. Ensure the mounting bracket is secure. Use adhesive if necessary.
Conclusion
Removing a rear view mirror from a ball joint is easier than it seems. Follow the steps carefully to avoid damage. Always have the right tools on hand. This ensures a smooth and safe removal process. Now, you can confidently tackle this task on your own.
Happy driving!